Sounds simple right? Wrong!
If you want to create a print-ready pdf you shouldn’t be using Photoshop at all! Huh?! So how do you make your Photoshop file print ready?
So firstly why shouldn’t you use Photoshop to create a print-ready pdf? Photoshop is unable to create pdfs with crops and bleeds, both of which are elements your printer will require on your artwork.
You can put this in yourself but it can get a bit fiddly and confusing for the printer so it’s best practice to export your file and create a print-ready pdf using either Adobe Illustrator or InDesign.
Here’s how to turn your Photoshop document into a print-ready pdf.
PREPARING YOUR PSD FILE IN PHOTOSHOP
Firstly make sure your file is 320 dpi for it to be good enough for print. The dpi can be reduced for larger files but discuss this with your printer if you plan to do so.
Next, SAVE YOUR LAYERED ARTWORK!! Once you’ve done this save the artwork again but this time under a new name. Typically the same name with “-flat” at the end of it, eg. “artwork-flat.psd”. Why do this? Because you now need to flatten your artwork completely to bring it into Illustrator or InDesign. A layered file will need to be flattened to work in Illustrator or Indesign and it helps to reduce the overall file size of your artwork, making it easier to export.
Why save it as a separate file? Because saving over your original file with the flattened version can happen all too easily and so it’s important to take as many measures as humanly possible to avoid that potential catastrophe!
To flatten your artwork go to the “Layer” option in the top bar and select “Flatten image”. Another easy way to do this is to simply right-click on one of your layers and again select “Flatten image”.
Once the layers have been merged to become one flattened layer save your file under the new file name, eg. “artwork-flat.psd”. DO NOT SAVE OVER YOUR ORIGINAL LAYERED FILE! Seriously, we can not say this enough! Once you’ve saved the file it’s ready to be brought into Illustrator or InDesign.
CREATING YOUR PDF IN ILLUSTRATOR
Open Illustrator and in the top Navigation Bar select File->New. Name the file whatever you like and click ok, for now, the size and bleed do not matter as we will change these later.
The next step is to go back to the File dropdown and select “Place…”. Then simply select your flattened .psd file and click ok.
Make sure the artwork is placed in the center of your artboard. It doesn’t matter if your artwork is larger than the current artboard as we are about to edit the size.
Click off your artwork so that the blue cross and outline no longer appear over the artwork. Doing this should change the bar at the top to reveal at “Document Setup” button. Click this to have a pop-up window appear on your screen like the one shown here:
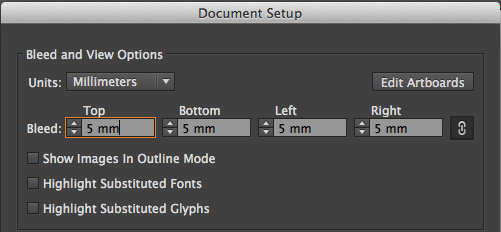
Setting 5mm bleed in Adobe Illustrator
Set your bleed to 5mm on all sides of your document. If you are printing a particularly large document or want to print a lot of your artwork at once then increase the bleed to a size that suits your needs most.
Once you’ve set your bleed click on the “Edit Artboards” button on the top right of the pop-up window. This should create a dotted white line around your artboard. Hovering over the white squares on the dotted line you can click and drag the line to match up with the edge of your artwork until the artboard matches the size of your artwork perfectly. If you know the size of your artwork (this will be whatever size it was set to in Photoshop) then you can use the width and height settings in the options bar above.

Setting width and height in the option bar
Once you are happy with the size of your document and the bleed setting simply click on the cursor icon to set your new size. If you like you can now add any Illustrator elements to your design at this point. Once you are happy with your design you can now save the file as a print-ready pdf. To do this go to File->Save As… Select “Adobe PDF (pdf)” from the format options and name your file. Click save and the Presets window will appear.
All you need to do now is to make it print-ready. Check that the “Trim Marks” and “Use Document Bleed Settings” are ticked in the “Marks and Bleeds” section and click “SAVE PDF”.
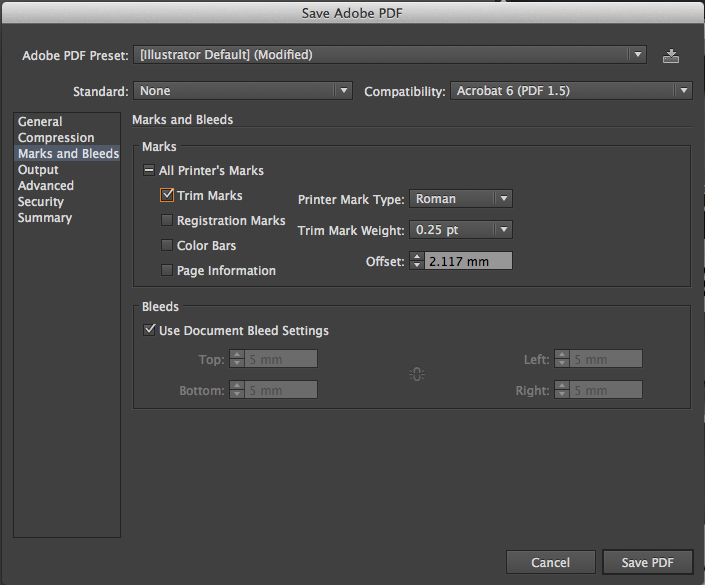
Adobe Illustrator – “Save Adobe PDF” settings
And that’s it, your file is now a print-ready pdf and ready to be sent to the printers.
CREATING YOUR PDF IN INDESIGN
Open InDesign and in the top Navigation Bar select File->New->Document. Make sure “Facing Pages” is unticked and click ok, for now, the size and bleed do not matter as we will change these later.
The next step is to go back to the File dropdown and select “Place…”. Then simply select your flattened .psd file and click ok.
The image will initially be attached to your cursor so simply click on the artboard for your artwork to appear.
Go back to the File dropdown in the navigation bar and select “Document Setup…”. Alter the width and height to match your original PSD file dimensions and set your bleed to 5mm on all sides of your document, then click ok.
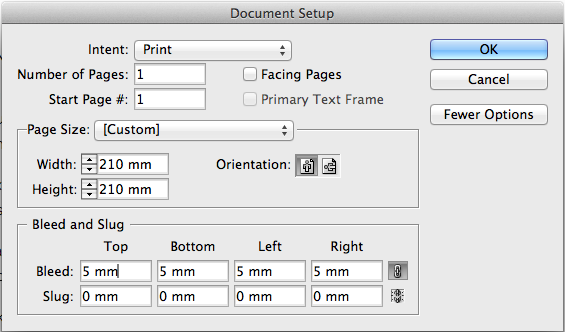
Setting bleed in InDesign
If you like you can now add any InDesign elements to your design at this point. Once you are happy with your design you can now save the file as a print-ready pdf. To do this go to File->ADOBE PDF Presets->[High-Quality Print]…
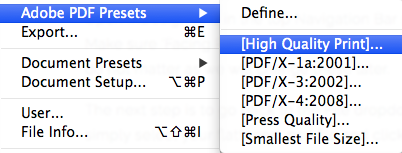
Saving a High-Quality PDF in Adobe InDesign
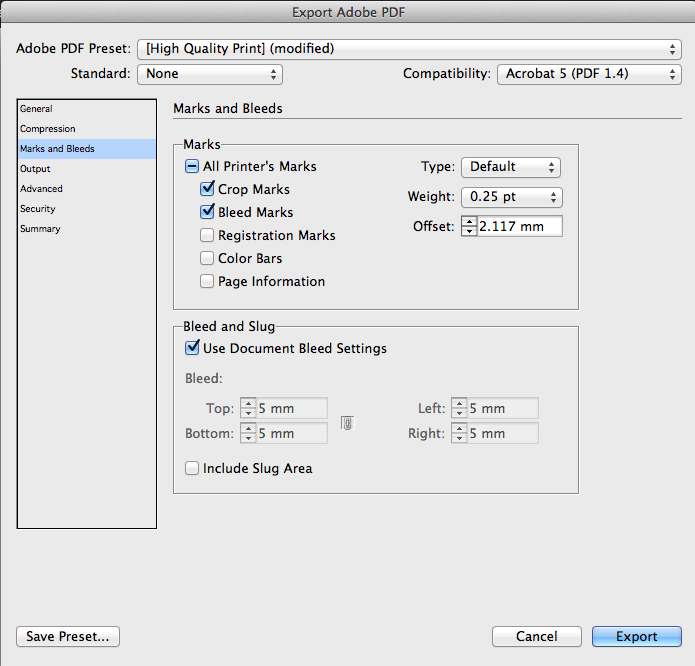
Name your file and decide where you would like the file to be saved on your computer. Click “Save” and the “Export Adobe PDF” window will appear.
All you need to do now to make your file print ready is to tick the “Use Document Bleed Settings” box in the “Marks and Bleeds” section and make sure “Crop Marks” and “Bleed Marks” are also ticked. After this simply click “Export” and your file is now print-ready and can be sent to your printer.
Exporting a PDF in Adobe InDesign

